Technology enhanced classrooms are equipped with the latest technology and are designed to enhance the integration of technology into the curriculum. Teaching with technology can engage students at all levels and enhance their learning experience in and out of the classroom. The following resources contain helpful guides on how to effectively use the technology integrated into these classrooms.
In-Person Workshops
Classroom Technology Overview
This workshop will cover using the instructor’s station and multimedia control panel. It will also include an overview of capturing lectures with Panopto in Canvas and a brief introduction to the document camera. All workshops are held in Library North B-130, and each session is 1 hour long.
- Thursday, August 20, 10:30 am to 11:30 am
Elmo Document Camera
This workshop will cover using the instructor’s station and multimedia control panel and details on using a document camera. The ability to display and annotate. All workshops are held in Library North B-130, and each session is 1 hour long.
- Thursday, August 20, 1:00 pm to 2:00 pm
Sign Up for In-Person Workshops
On-Demand Training
This course is a comprehensive guide for the Technology Classroom:
- Using the Instructor’s Station and Multimedia Touch Panel: Learn how to navigate and utilize the classroom’s equipment effectively.
- Presenting with Various Inputs: Discover how to present using the classroom’s PC computer, wireless devices, or HDMI inputs.
- Lecture Capture with Panopto: Get an overview of capturing lectures and content using Panopto.
- Using the Elmo Document Camera: Gain detailed knowledge on operating the Elmo document camera for enhanced presentations.
Enroll in the Classroom Technology Canvas course and learn at your own pace.
Video Tutorials
These videos provide an overview of the technology enhanced classrooms and demonstrate how to do presentations and lecture captures.
How-to Guides
These guides provide step-by-step instructions on how to use classroom technology for presentations, lecture captures, and more.
Every technology enhanced classroom has the same equipment available: lectern, touch panel, document camera, USB connectors, display screens, and speakers. The difference between presentation classrooms and lecture capture classrooms is that lecture capture classrooms include cameras and microphones.
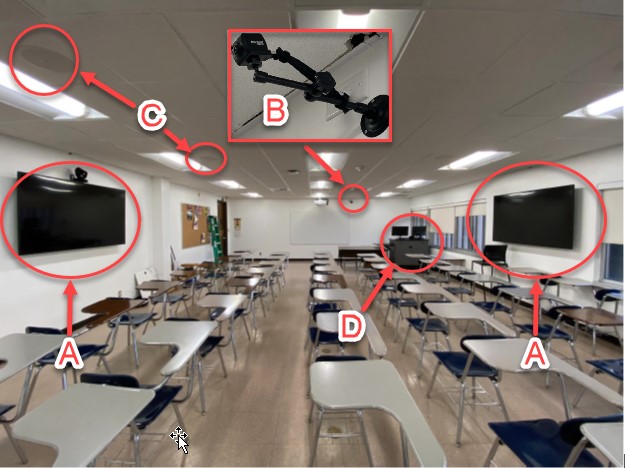
Displays
Two content displays are mounted on opposite sides of the room and mirror the same content shown by the projector (see A in the image above). One of the content displays has a presenter camera mounted above it.
Cameras
There are two cameras in the room, one for the presenter and one for the audience. The presenter camera location varies by room and the camera can be controlled from the touch panel at the lectern. The audience camera is mounted behind the lectern to provide a video feed of in-room participants (see B in the image above).
Note: Cameras are only available in lecture capture classrooms.
Speakers
The speakers are mounted in ceiling tiles throughout the room to distribute presentation audio to all in-room participants (see C in the image above).
Lectern
The lectern is located at the front of the room and houses the touch panel, room PC, monitors, document camera, USB port, and input adapters.
- Touch panel: The touch panel serves as the system control for the equipment in the room (see E in the image below).
- Room PC: The room PC can be used as a source for presentations and lecture captures (see G in the image below).
- Monitors: The primary monitor is on the left-hand side and the secondary monitor is on the right-hand side. The content on the primary monitor is only viewable by the presenter. The content on the secondary monitor will be broadcast to all room displays. To present content, drag the content window from the left monitor to the right.
- Document camera: The document camera can be used to project images of documents and objects onto the room displays (see H in the image below).
- USB port: The USB port can be used to connect a USB drive to the room PC.
- Input adapters: The input adapters can be used to connect a laptop or tablet to the room system (see F in the image below). Below is a list of available adapters:
- HDMI adapter
- Mini HDMI adapter
- Micro HDMI adapter
- Type C
- Display Port
- Mini Display Port

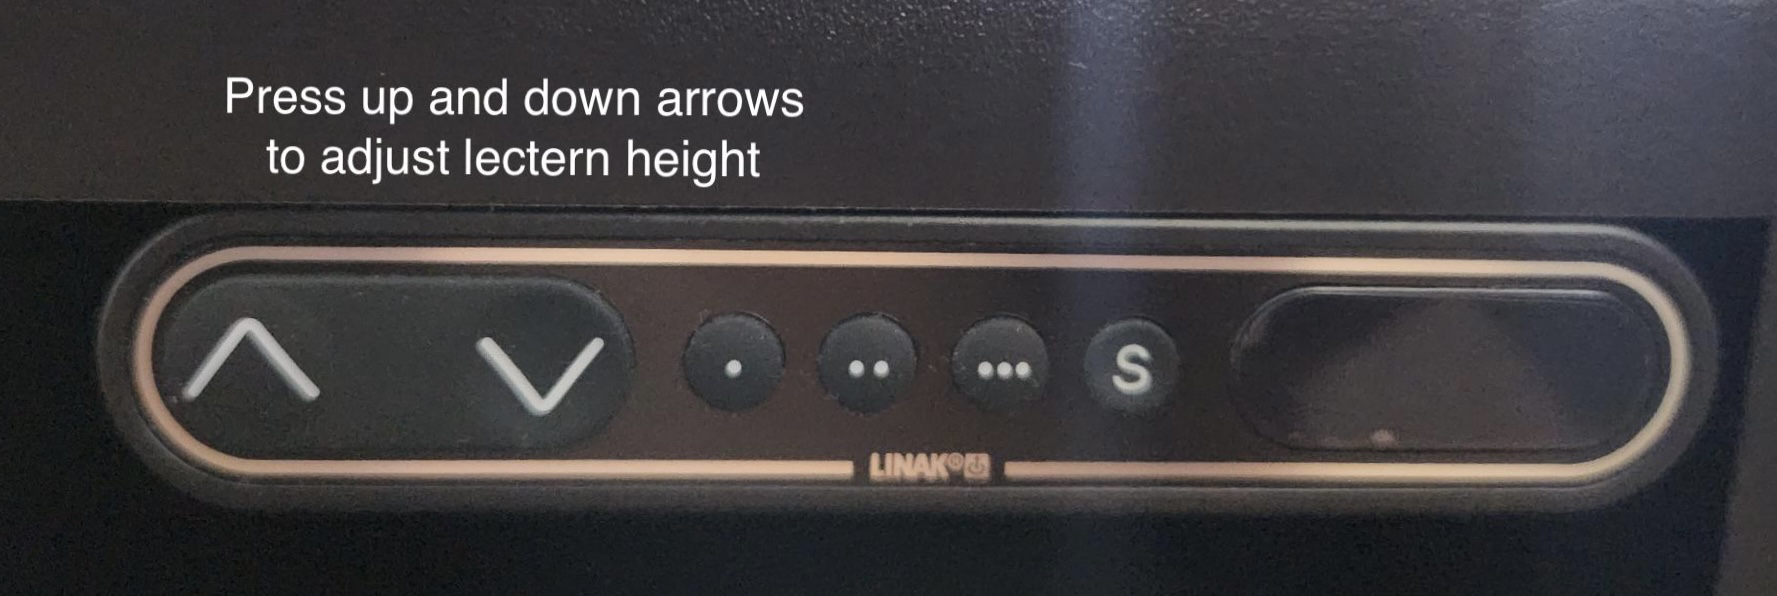
- Lectern: The lectern's height can be adjusted. Look for the button panel with the up/down arrrows on the top right corner of the lectern.
Microphones
The beamforming microphones are mounted in the ceiling tiles to capture audio for recordings and far-end participants.
Note: Microphones are only available in lecture capture classrooms.
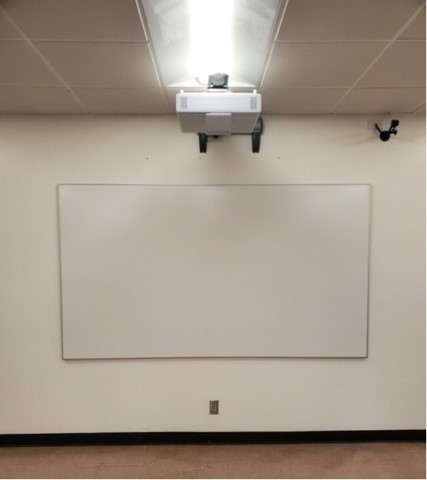
Whiteboard and Projector
The whiteboard and projector are located at the front of the room. The whiteboard can be used to display content from the projector and can also be used as a regular, writable whiteboard.
The touch panel provides a user-friendly interface to control the technology in a classroom. When the system is idle, the touch panel screen is black. To start up the system, tap anywhere on the screen. After a short warm-up period, the home screen will display.
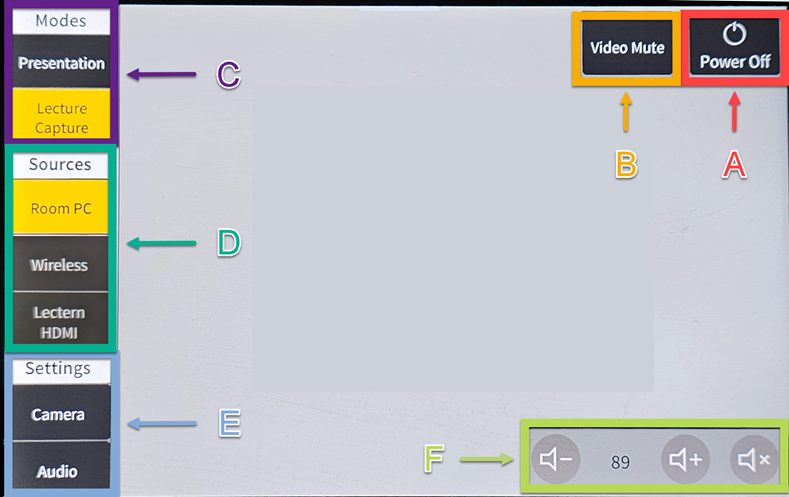
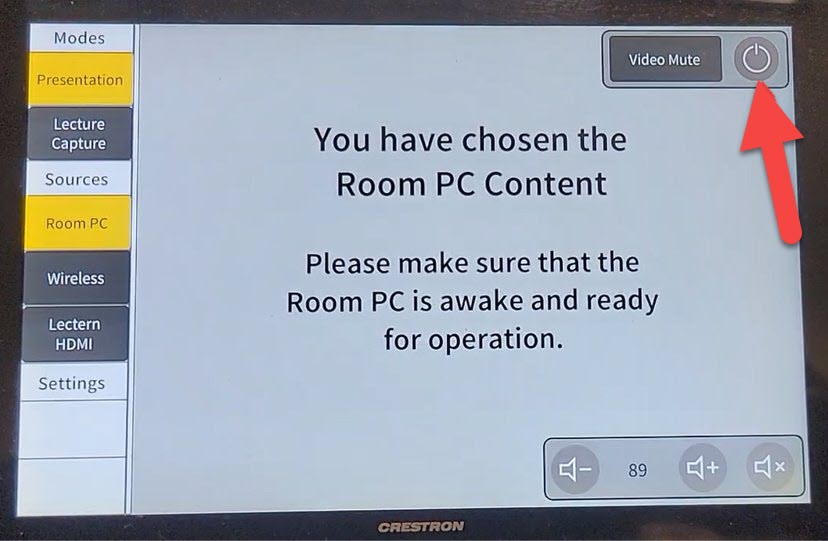
Power Off Button
The Power Off button is in the upper-right corner of the home screen (see A in the image above) and is used to power down the entire system (displays, projector, and cameras).
Video Mute Button
The Video Mute button is in the upper-right corner of the home screen (see B in the image above). Tapping the Video Mute button will stop displaying the video content; tapping the button again will resume the display of the video content. Please note that the "Video Mute" button will not turn off the system.
Volume
The volume control is in the lower-right corner of the home screen and is used to adjust the volume level (see F in the image above).
- Tapping Volume Down (-) decreases the volume.
- Tapping Volume Up (+) increases the volume.
- Tapping Volume Mute (x) mutes the audio.
Modes
The Modes section is on the left side of the home screen and includes two options (see C in the image above).
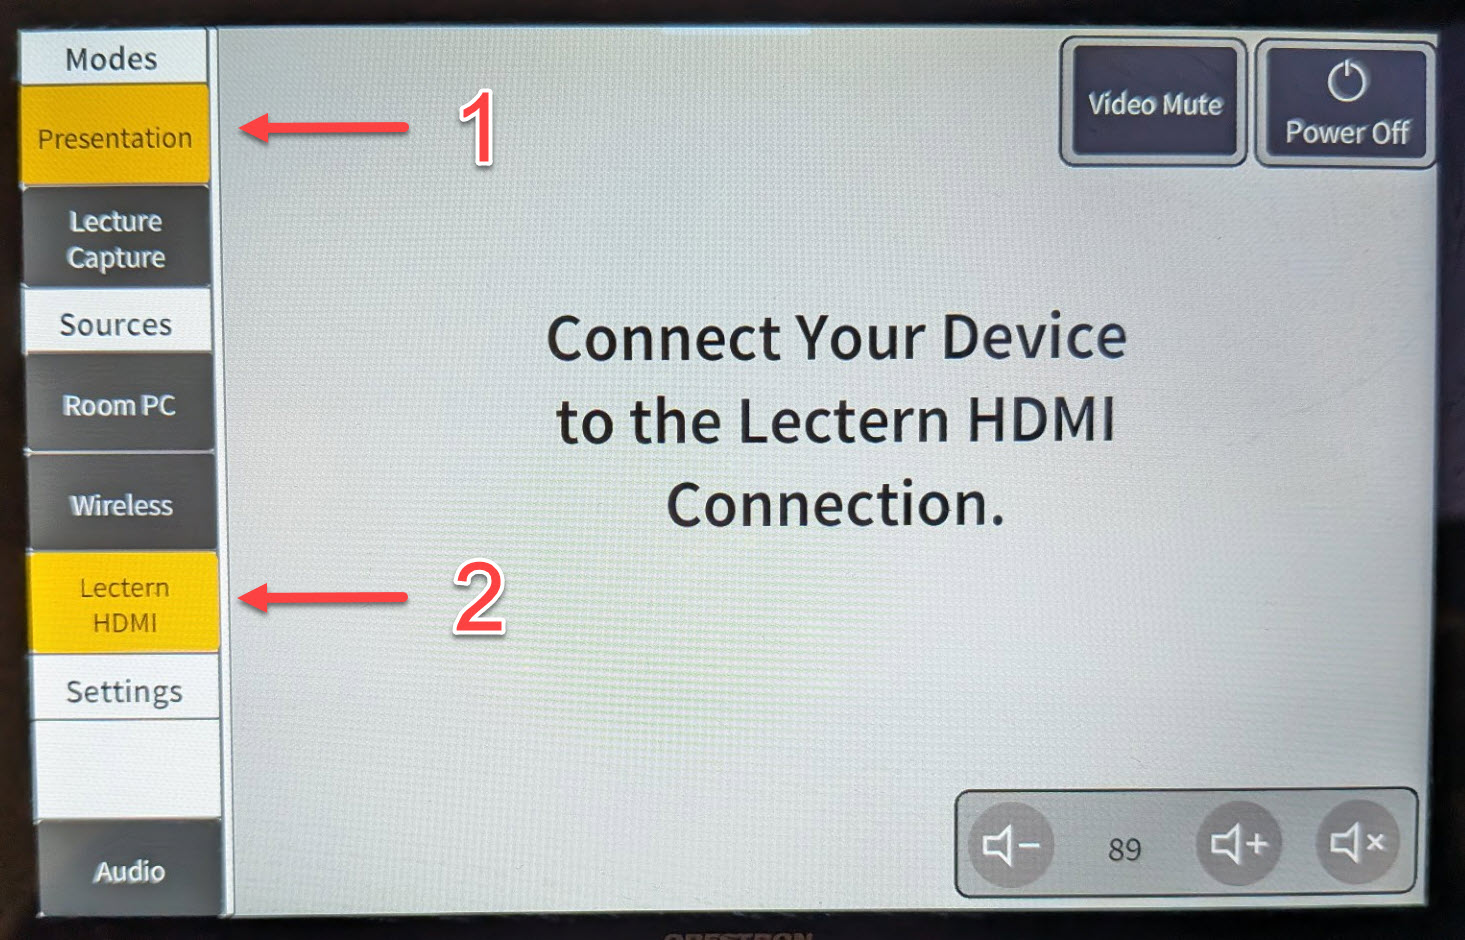
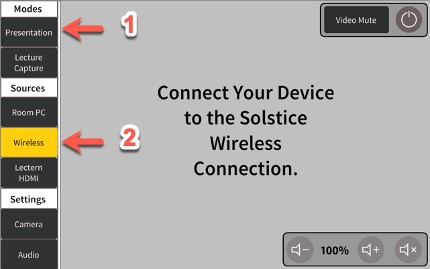
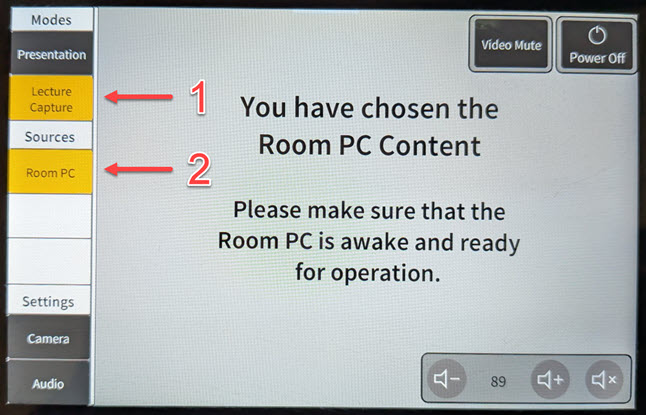
- Presentation: This mode is used for non-recorded in-room presentations. When this mode is selected, you can choose one of three sources to present from: Room PC, Wireless, or Lectern HDMI (laptop or tablet).
- Lecture Capture: This mode allows you to record your lecture and presentation for later distribution through the Panopto video platform. When this mode is selected, you can only choose Room PC as the source.
Sources
The Sources section is on the left side of the home screen and includes three options (see D in the image above).
- Room PC: This source allows you to present content from the room PC at the lectern. This source can be used in both Presentation mode and Lecture Capture mode.
- Wireless: This source allows you to share content to the room displays wirelessly. This source can only be used in Presentation mode.
- Lectern HDMI: This source allows you to present content from your personal device (laptop or tablet) by connecting it to the HDMI cable on the lectern. This source can only be used in Presentation mode.
Settings
The Settings section is on the left side of the home screen and includes two options (see E in the image above).
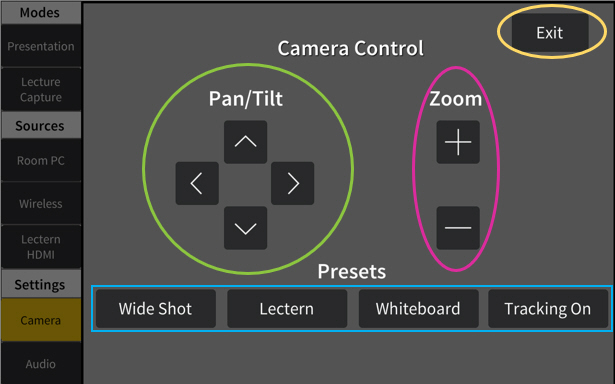
- Camera: Tapping Camera under Settings displays the Camera Control screen on the touch panel. These settings can be used to adjust the presenter camera before starting a new recording. The camera can be adjusted by using the manual controls (Pan/Tilt and Zoom) or by selecting one of the Presets (Wide Shot, Lectern, Whiteboard, or Tracking On).
- Pan/Tilt: These controls are used to adjust your camera angle up (^), down (v), left (<), or right (>).
- Zoom: These controls are used to zoom in (+) or out (-).
- Wide Shot: This option provides a wide-angle view of the front of the lecture hall and the presenter. This is the default view.
- Lectern: This option provides a view of the lectern and the presenter.
- Whiteboard: This option shows a view of the whiteboard.
- Tracking On: This option turns on tracking which allows the camera to follow the presenter. This is not recommended if there is more than one presenter in the camera view.
- Exit: Tapping this button exits the Camera Control screen.
- Audio: Tapping Audio under Settings displays the Audio Settings screen on the touch panel. These settings can be used to adjust the volume of the wireless microphones in the room. The Audio option only applies to lecture halls, not standard classrooms.
The lectern includes a room PC that can be used for presentations and lecture captures.
To log in to the room PC:
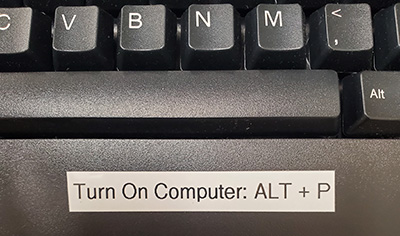
- Locate the keyboard on the lectern and press ALT + P to wake up the room PC. You may need to press ALT + P four to five times to wake up the computer.
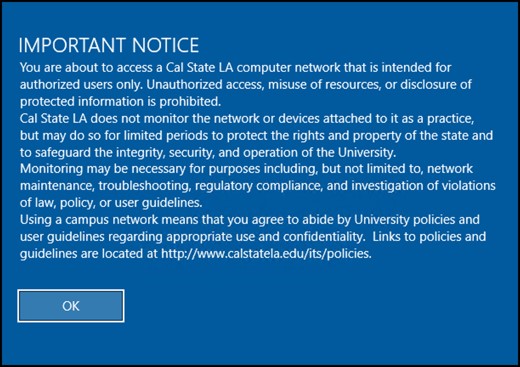
- Once the disclosure screen appears, click the OK button to accept the terms.
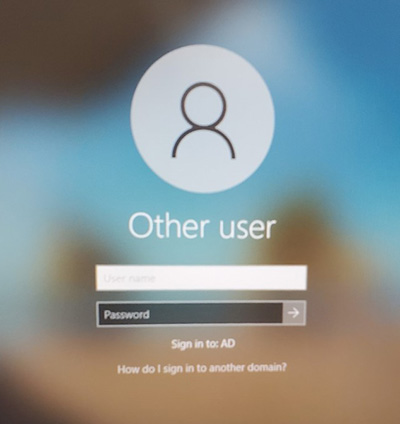
- On the login screen, log in with your MyCalStateLA ID username and password.
Presentations can be made using the room PC at the lectern.
To present content from the room PC:
- Locate the touch panel on the lectern and tap anywhere on the screen to start up the system.
- On the home screen of the touch panel, select Presentation under Modes, and then select Room PC under Sources.

- Wake up the room PC by pressing ALT + P on the keyboard. You may need to press ALT + P a few times to wake up the computer. Then, click the OK button on the disclosure screen, and then log in with your MyCalStateLA ID username and password. Once logged in, the secondary (right) monitor will be mirrored across all the room displays.
- Open your presentation file. If the file is stored on a USB drive, connect the drive to the room PC using the USB port on the lectern.
- Move your presentation materials to the secondary monitor to broadcast the content to all the room displays.

You can connect your own device, such as a laptop or tablet, to the room displays and use it for presentations.
Note: Lecture capture using Panopto and the in-room cameras will not work using your own device. Use the room PC for any lecture captures.
To present content from your laptop or tablet:
- Locate the touch panel on the lectern and tap anywhere on the screen to start up the system.
- On the home screen of the touch panel, select Presentation under Modes.
- Connect your device to the HDMI cable on the lectern.
- On the home screen of the touch panel, select Lectern HDMI under Sources.
- Once your device’s display screen is showing on the room displays, use the device as normal to broadcast content.
You can use a wireless connection to share content from your own device to the room displays.
Note: When connecting to the projector wirelessly, your device will lose connection to the campus Wi-Fi network.
To present content using a wireless connection:
- Locate the touch panel on the lectern and tap anywhere on the screen to start up the system.
- On the home screen of the touch panel, select Presentation under Modes, and then select Wireless under Sources.
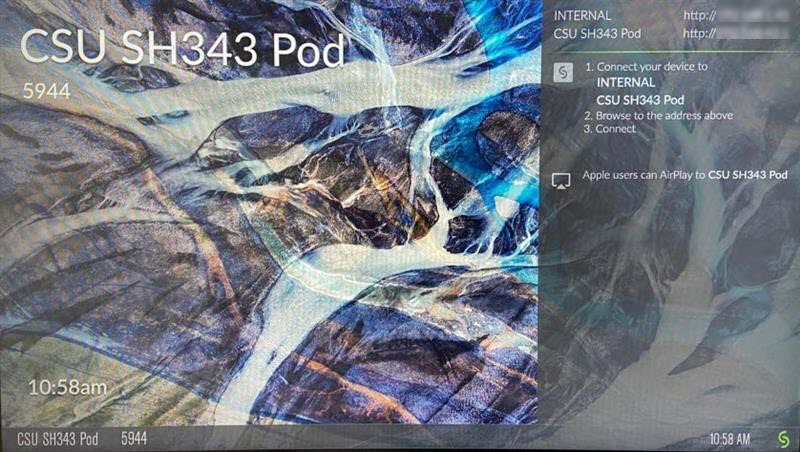
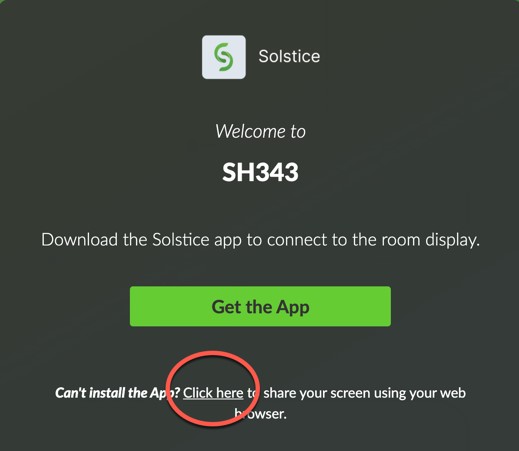
- Once the Solstice screen with connection instructions appears on the room displays, do the following:
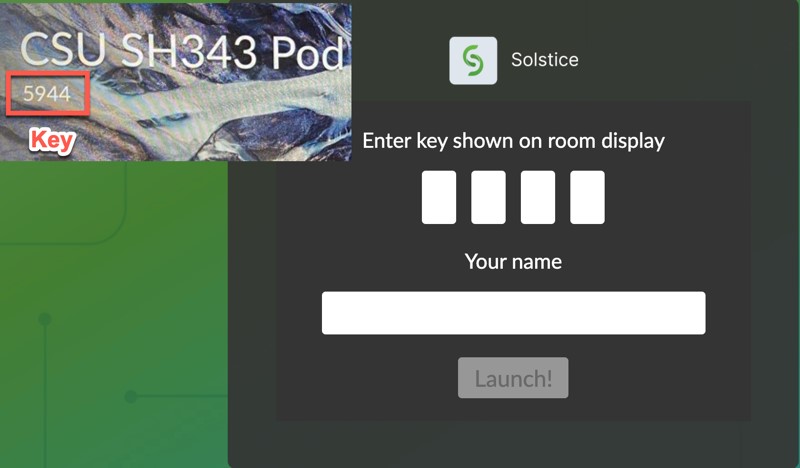
- Connect your device to the wireless network listed as CSU ROOM# Pod.
- Open a web browser on your device and go to the IP address listed next to CSU ROOM# Pod.
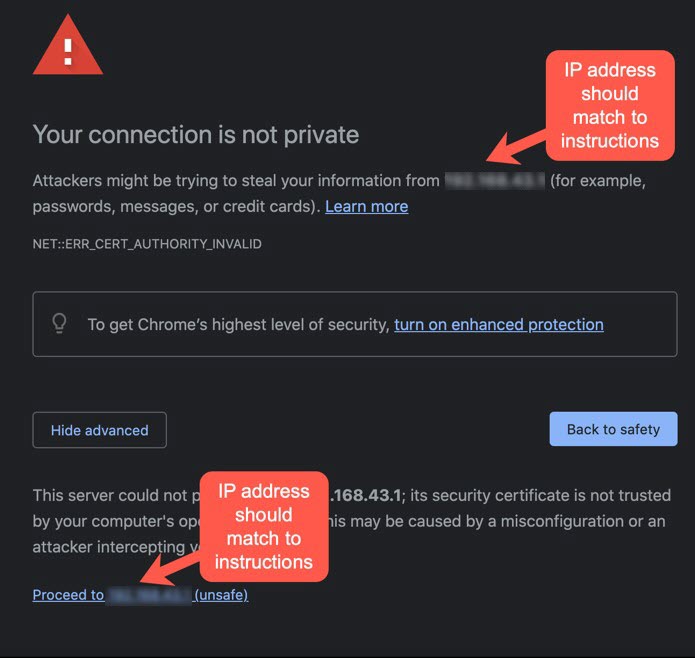
- If a Your connection is not private message appears, verify that the IP address in the message matches the one listed on the room displays, click the Advanced button to view more options, and then click Proceed to [IP address] (unsafe).
- On the Solstice connection page, click the Click here to share your screen using your web browser.
- Enter the 4-digit key shown on the room displays, enter your name, and then click the Launch button.
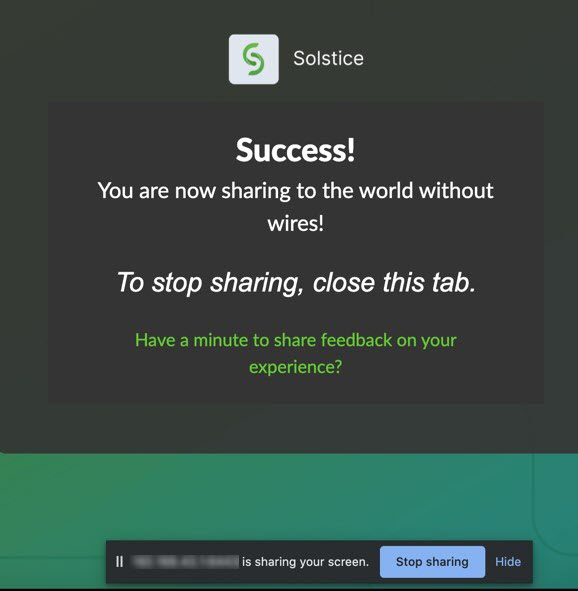
- Once your device is successfully connected, your device screen will immediately start sharing across the room displays. To stop sharing, close the browser tab or click the Stop sharing button at the bottom of your screen.
Lecture capture classrooms enable faculty to record classroom lectures as videos and post them online, allowing students to view them on-demand, outside of class time. Recordings are made using Panopto, a video platform that can be used to record, host, and share videos. Panopto works best in conjunction with Canvas so you can easily add recordings to your Canvas courses.
It is highly recommended that you connect Panopto to Canvas before your first lecture capture in a classroom. This is done within Canvas and step-by-step instructions can be found on the How to Access Panopto in a Canvas Course page.
To record a lecture using Panopto:
- Locate the touch panel on the lectern and tap anywhere on the screen to start up the system.
- On the home screen of the touch panel, select Lecture Capture under Modes. Under Sources, Room PC is automatically selected.
- Wake up the room PC by pressing ALT + P on the keyboard, click the OK button on the disclosure screen, and then log in with your MyCalStateLA ID username and password.
- Launch the Panopto application by double-clicking the Panopto icon on the desktop.
- The Panopto Sign in window opens. Click the Sign in button.
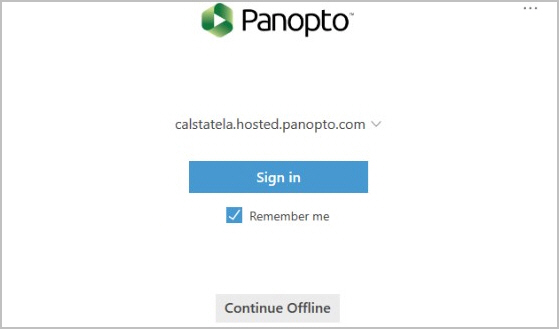
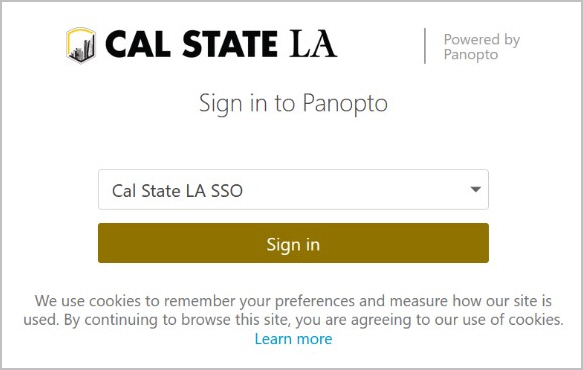
- The Cal State LA Sign in to Panopto page opens in the default web browser. Ensure that Cal State LA SSO is selected from the drop-down menu, and then click the Sign in button.
- You are redirected to the Cal State LA login page. Log in with your Cal State LA email address and password.
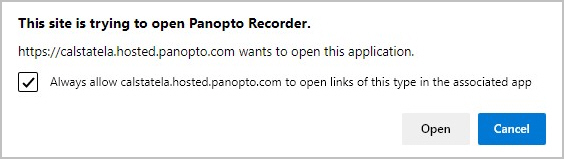
- The web browser displays a prompt stating that the site wants to open Panopto Recorder. Select the Always allow checkbox, and then click the Open button.
- The Panopto application window opens. Click Create New Recording in the upper-left corner of the window.
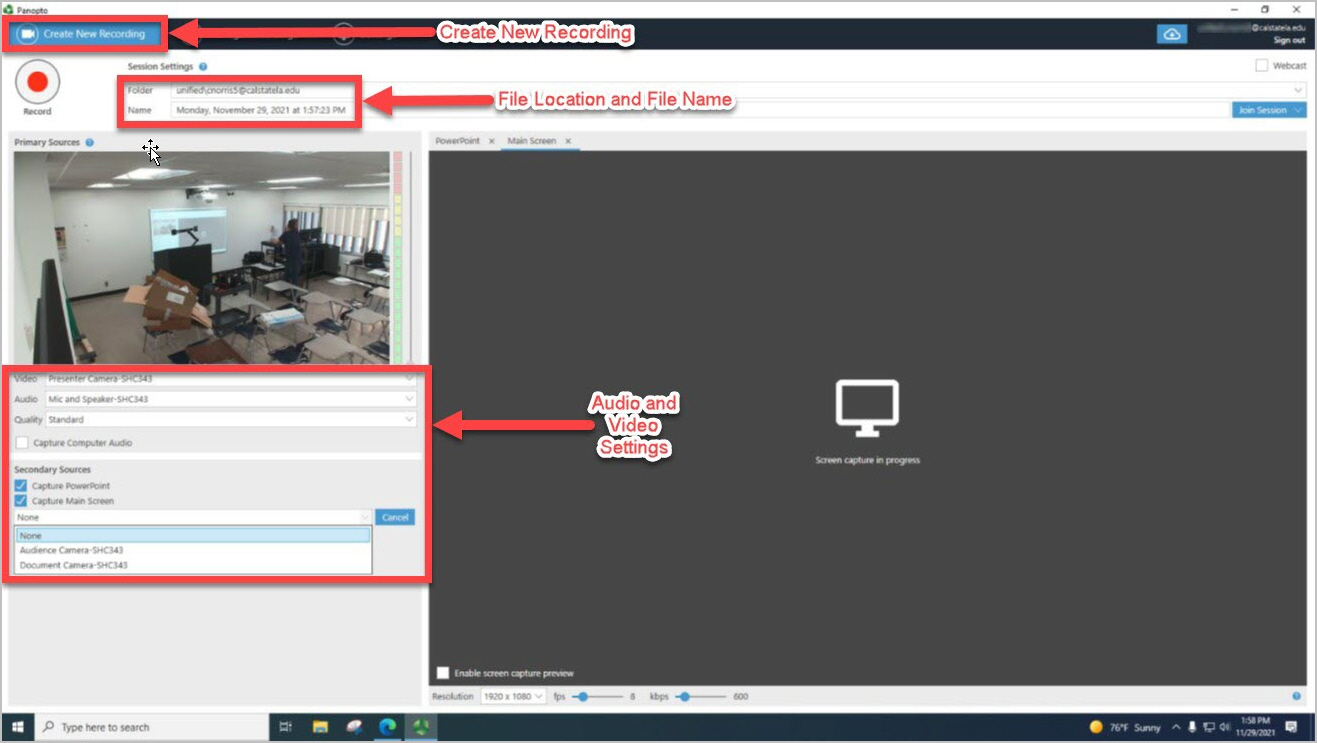
- Under Session Settings, specify a storage location and a name for the recording.
- From the Folder drop-down menu, select one of the following options:
- To save the recording to a specific Canvas course, select the desired Canvas course folder. For the Canvas course folder to appear on the Folder drop-down menu, Panopto must be enabled in your Canvas course. For instructions, see How to Access Panopto in a Canvas Course.
- If you have not enabled Panopto in your Canvas course, select My Folder to save the recording in your Panopto folder. Once in this folder, the recording can be embedded in your Canvas course. For instructions, see How to Embed Panopto Videos in a Canvas Course.
- In the Name field, enter your preferred name for the recording session. The default name is the date and time the video is recorded.
- From the Folder drop-down menu, select one of the following options:
- Under Primary Sources, select the main video and audio sources you want to capture.
- From the Video drop-down menu, select Presenter Camera. You can adjust the presenter camera from the touch panel by tapping Camera under Settings.
- From the Audio drop-down menu, select Mic and Speaker.
- From the Quality drop-down menu, select Standard. This setting controls the capture quality of the primary sources.
- To capture audio from the PC applications, select the Capture Computer Audio checkbox.
- Under Secondary Sources, select any additional sources you want to capture
- To capture a PowerPoint presentation, select the Capture PowerPoint checkbox.
- To capture the content on the primary monitor, select the Capture Main Screen checkbox.
- To capture additional sources, select Audience Camera or Document Camera from the drop-down menu.
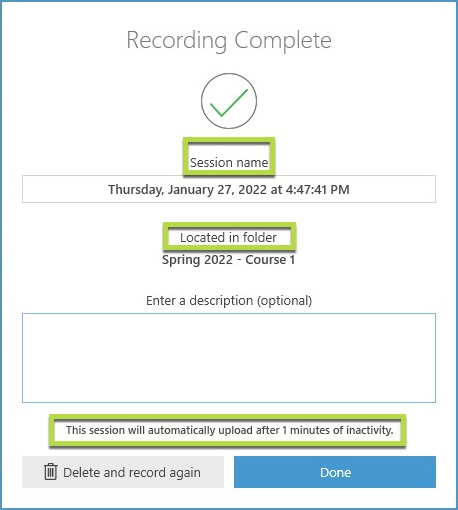
- When you are ready to start recording, click the Record button in the upper-left corner of the window. Once your recording has started, the Record button will change into Stop and Pause.
- When you are done recording, click the Stop button.
- The Recording Complete dialog box opens. It includes the session name, the location of the recording, and a note stating that the session will automatically upload after 1 minute of inactivity. Click the Done button.
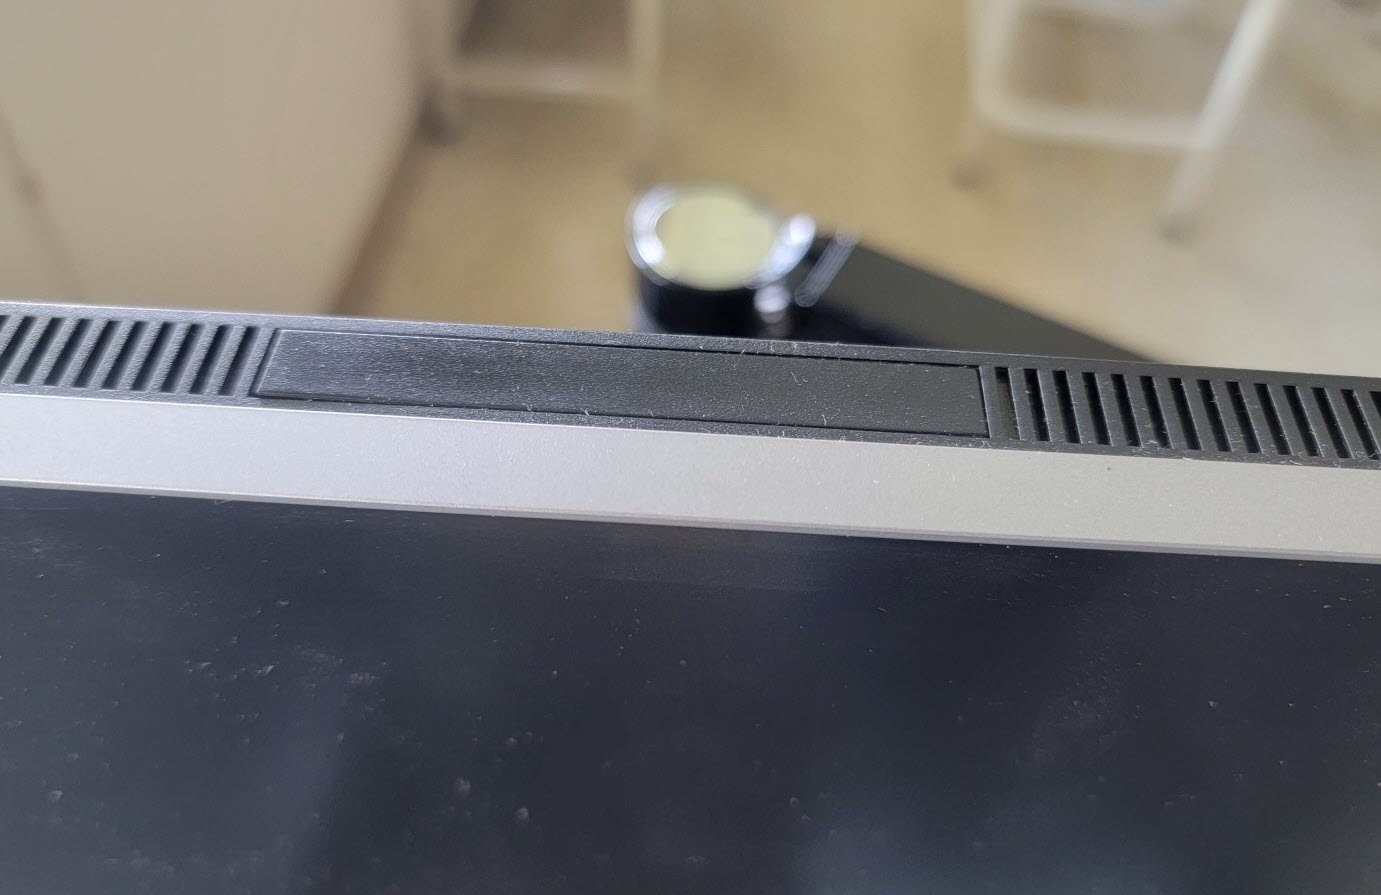
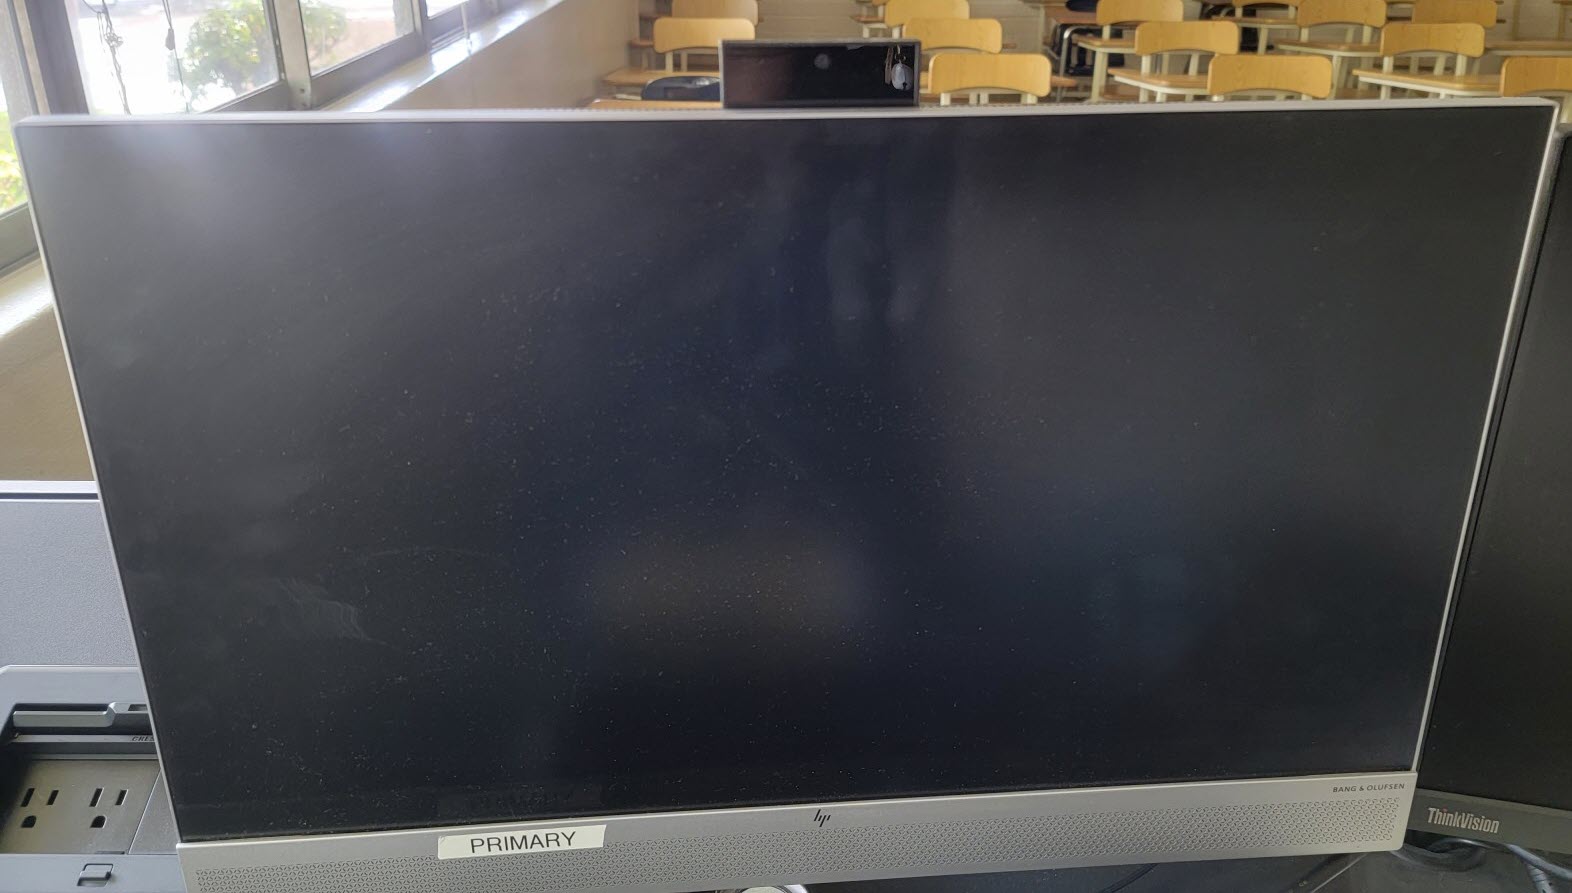
To open your camera:
- Usually, the camera is hidden inside the monitor. Identify the center on top of your primary monitor.
- Push down on the center of the monitor; the camera will pop up.
- Once you're done using the camera, push the camera down to close it.
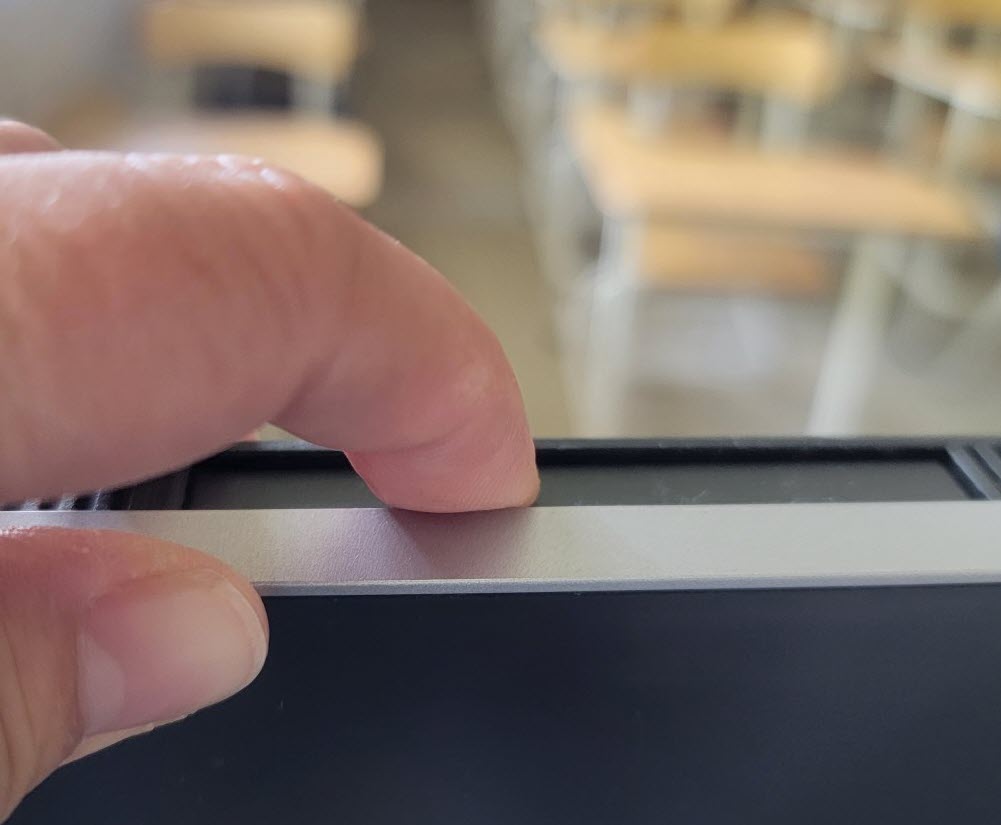
You can use this helpful guide Monitor Guide
The document camera can be used with the room PC to project images of documents and objects onto the room displays.
To use the document camera:
-
Locate the touch panel on the lectern and tap anywhere on the screen to start up the system.
-
On the home screen of the touch panel, select Presentation under Modes, and then select Room PC under Sources.
-
Wake up the room PC by pressing ALT + P on the keyboard, click the OK button on the disclosure screen, and then log in with your MyCalStateLA ID username and password.
-
Double-click the Elmo Interactive icon on the desktop.
-
Once the Elmo Interactive application opens on the room PC, place the document or object you want to share under the document camera lens and the image will show on the room displays.
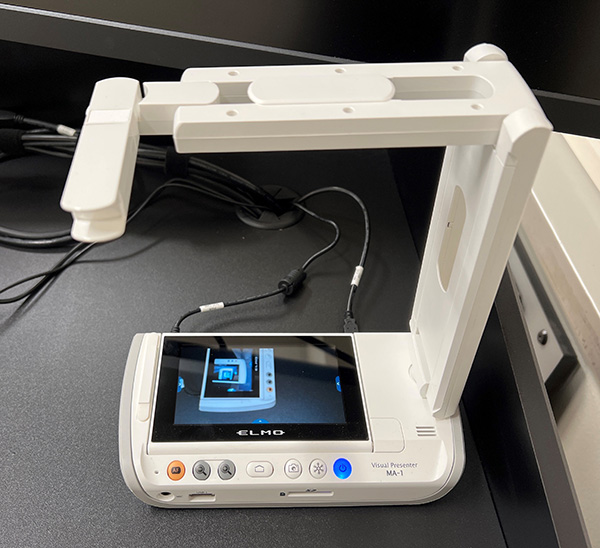
You can use this helpful guide for Elmo Support.
To end your session, do the following:
- Turn off the system by pressing the Power Off button located on the top right corner of the Crestron touch panel. Failure to turn off the touch panel system will result in the projector randomly shuts down during the following class when the 4-hour automatic shut down period is reached.
If the projector or the display suddenly turns off during your class, press the Crestron Power Off button and select Shut Down. You will hear a beep. Wait 30 seconds and touch anywhere on the display to turn on the Crestron. You will hear a beep again indicating the projector has powered on. This should resolve the problem.
- If you have been connecting to the Room PC, log off from the computer by clicking the Windows icon in the bottom left corner. Then, clicking on your name and select "Sign out." Do NOT shut down or power off the computer.
Technical Support
Need help with classroom technology? Contact your college ITC or email Classroom Support.
When contacting support, please be ready to provide the following information: your name and employee number, department, the classroom building and room number, a detailed description of the issue, and urgency.