There are a couple reasons why you may want to use the Zoom tool in your course.
- You may want to set up a repeating weekly meeting session online for the whole duration of your course.
- Holding office hours online for online, hybrid or face-to-face courses.
- Setting up a one-time meeting session in your course, in case you won’t be able to physically make it to a class session.
- Scheduling an online study session with your students before an important exam.
The CalStateLA Zoom tool makes these options possible. However, these options require technical steps. The Canvas Zoom guide below have instructions for creating these types of Zoom meetings.
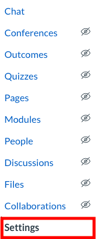
Adding Zoom to your Course Navigation
To enable Zoom from within your Canvas course:
- Click on the course "Settings" navigation item (the last item in the left navigation).
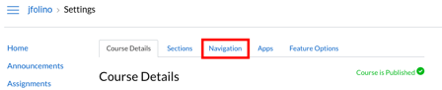
- On the course "Settings" page, there are tabs across the top. Click on the "Navigation" tab.
You should see "Zoom" in the list of items you can enable in your Canvas course navigation.
- Click on the three dots to the right of the Zoom title to expand the menu to "Enable" Zoom. Click on "Enable".
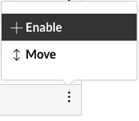
- MAKE SURE TO CLICK "SAVE" at the bottom of the Navigation page.

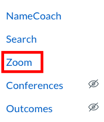
You should now see Zoom show up in your Canvas course left navigation menu.
Canvas Zoom Integration
- Click on Zoom and click on Schedule a New Meeting.

- On the following screen, be sure to select the appropriate date of the meeting. Check the Recurring meeting checkbox. Adjust the recurring meeting settings as needed.
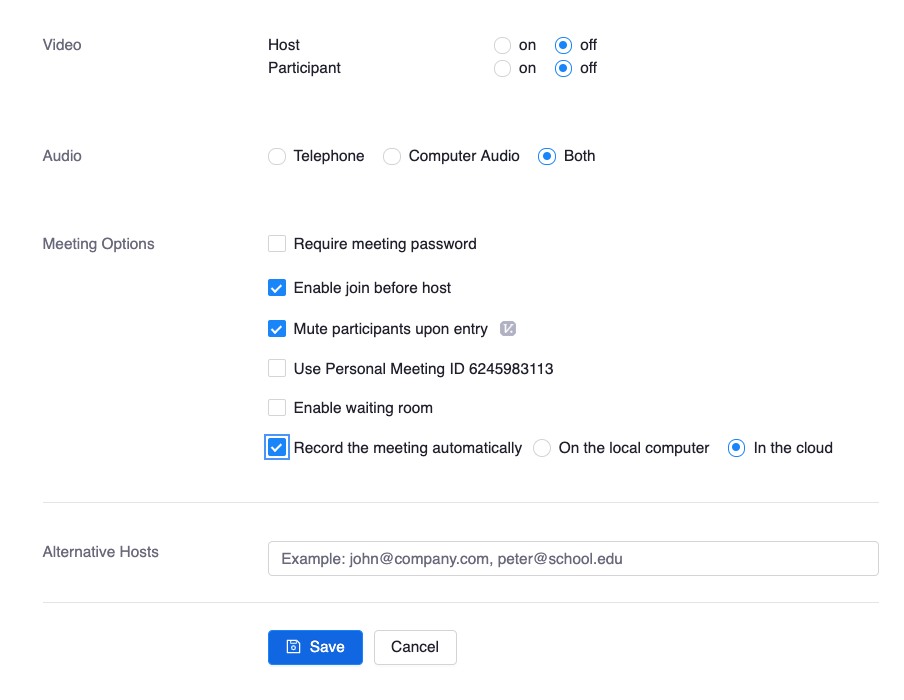
- Be sure video and audio is on for both you, the host, and the participants who will join this meeting. We recommend checking the Enable join before host checkbox. This is so in case your participants enter the meeting early, they can still interact with one another in the meeting room before you arrive. Furthermore, we also recommend checking the Mute participants upon entry checkbox. This is to ensure your participants can control when they enable their mic feed in the meeting room. This further ensures that your meeting isn’t accidentally disrupted when someone new enters the room in the middle of a meeting.
- Once you have selected the appropriate settings, click on the Save button.

- You can now copy your meeting link into your course so that students can access the room.
![]()
1. Click on the "Zoom" menu item (in your Canvas course left navigation) to launch the Zoom interface inside of your Canvas course.
2. From within the Zoom interface, click on "Schedule a New Meeting" and enter the meeting details, date, time, and duration of your class session.
3. Select your Zoom meeting settings including:
- Enable join before host.
- Mute participants upon entry.
- If you will be recording your class meeting, we recommend that you set the recording to be stored "in the cloud".
4. When finished, scroll to the bottom of the Zoom interface and click "Save".
Your meeting should show up in the Canvas course calendar.
There are two ways we recommend posting your recurring Zoom meeting to your Canvas course. One is through the Pages feature in Canvas, and one is through the Calendar feature in Canvas.
Posting Your Meeting through Pages
- Click on Pages and create a new page. For assistance in making a new page, please visit <https://community.canvaslms.com/docs/DOC-13018-4152724253>.
- Under Description, paste your Zoom meeting link and add instructions for participants to join the meeting. Also include a link for Joining a Zoom Meeting, which is provided by CETL.
- Publish the page once complete and add it to a module. For assistance in making modules, please visit <https://community.canvaslms.com/docs/DOC-13129-415241424>. Once complete, click on your link.
NOTE: Publish your module once you are sure that you would like it to be visible to students.
Posting Your Meeting through Calendar
- Click on Calendar.
- Click on + to create a new event.
- Click on the dropdown next to Calendar and select which course you would like.
- Click on More Options.
- Name the meetings under Event Title.
- Under Description, provide the meeting link, time(s) and day(s) of the scheduled meetings, and a few sentences as to why Zoom is being used in the course. Also include a link for Joining a Zoom Meeting, provided by CETL, and a link to the CalStateLA ITS page.

- Select the Date for the first meeting and the Time that the meetings will be held.
- Check the box for Duplicate. Enter how often and how long you would like to meet for.
- Check the box for Count to number each meeting.
- Click Create Event when complete and click on your meeting link.

Students can click on "Zoom" in the Canvas course left navigation menu to find all of the class sessions you've set up through Zoom.
- They will also be able to find any Zoom session recordings you have saved in Zoom's cloud.
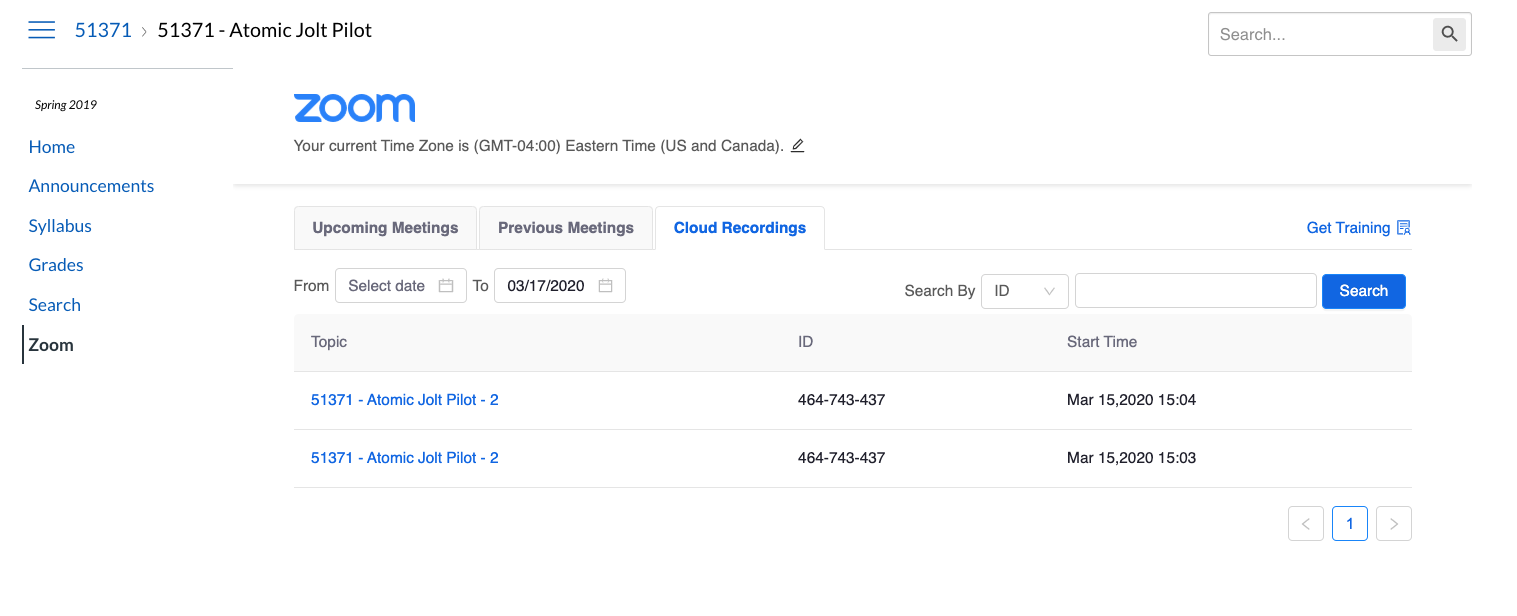
- IMPORTANT NOTE: During peak usage times, you may need to wait as much as 12-24 hours for the Zoom recording to be made available in the cloud.
- See these instructions if you have decided to save the Zoom class session recording to your laptop and would like to see ways you can make that available to students.