
Setting up your new MacBook
Congratulations! Please follow the steps below before you start to use it. Plug in the charger and turn on your macOS device.
- Select Your Country or Region: Choose a country to set the language and time zone for your Mac.
- Select Wi-Fi Network: Connect to your network. Enter password, if necessary.
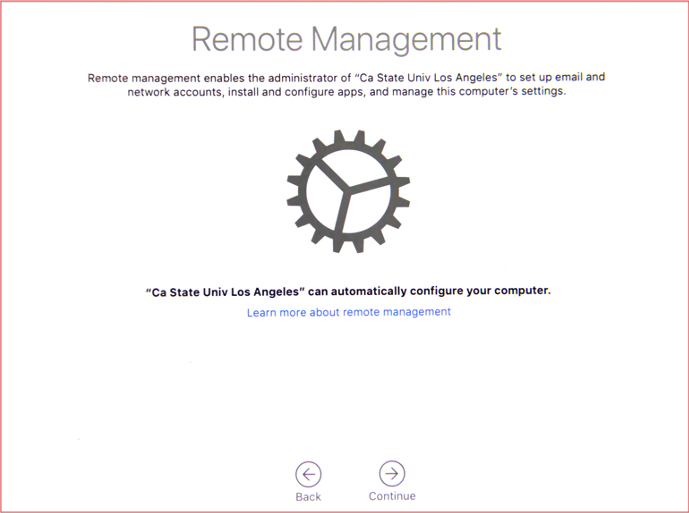
- Remote Management: The following screen will appear. Click Continue.
- Create a Computer Account: IMPORTANT! WAIT 5 MINUTES before creating computer account. After waiting 5 minutes, create computer account and click Continue.
- Setup Assistant will finish setting up your Mac.
- Your Mac is now ready to use.
Software Available for Installation
Updates on campus Macs are now done using the Software Center app located in the Mac OS Applications folder. The applications can be reinstalled via Software Center at any time.
Available Applications:
- Adobe Creative Cloud Desktop 2024 (System Requirement: MacOS 12.0 and above)
- Office 2022 (System Requirement: MacOS 12.0 and above)
- SPSS 29 (System Requirement: MacOS 10.15 and above)
- TechSmith (Camtasia 2024, Snagit 2024)
- Web Browsers (Firefox, Google Chrome)
- Global Protect – VPN Client
- Microsoft Remote Desktop
- Grammarly
- Microsoft Teams
- Zoom Meeting Client
Note: You must be connected to the Internet to perform the procedure. Installation time will vary depending on the speed of your Internet connection and the network hardware on your Mac.
- Launch the Software Center app in the Applications folder.

- Log in to Information Technology Services using your MyCalStateLA ID account.

- Click Install for every application you want to install.
